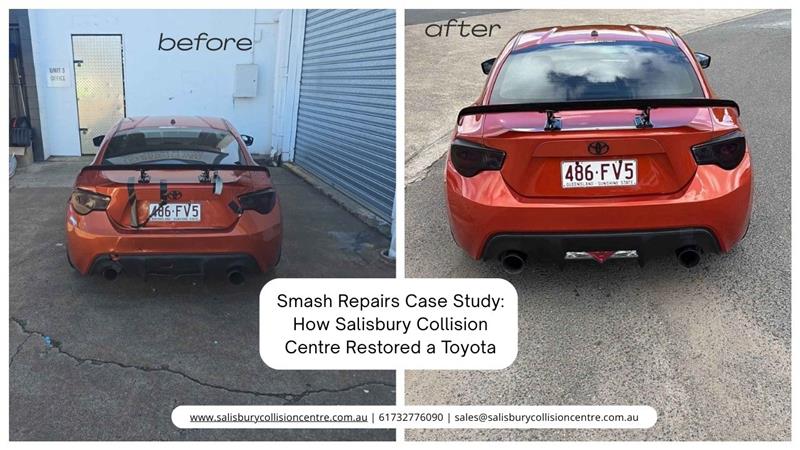
When a vibrant orange Toyota 86 arrived at our Salisbury workshop with significant rear-end collision damage, the owner was understandably concerned. Would their beloved sports car ever look the same again? This detailed case study walks you through every stage of our comprehensive smash repairs process, demonstrating how our expert technicians at Salisbury Collision Centre transformed damaged metal and paintwork back into showroom condition.
Serving the Brisbane communities of Salisbury, Annerley, East Brisbane, Greenslopes, Holland Park, Moorooka, Mount Gravatt, Sunnybank, Tarragindi, Woolloongabba, and Yeronga, we specialise in bringing vehicles back to life with meticulous attention to detail and uncompromising quality standards.
Stage 1: Initial Assessment and Damage Documentation
The smash repairs journey begins the moment a damaged vehicle arrives at our Brisbane workshop. For this Toyota 86, our first priority was conducting a thorough assessment to identify all visible and hidden damage.
- Comprehensive Vehicle Inspection
Our experienced technicians performed a detailed inspection that included:
- Photographic documentation: We captured multiple angles of the rear-end damage, including close-ups of the boot lid, rear bumper, tail lights, and spoiler. This creates a visual record for insurance claims and tracks our restoration progress.
- Structural integrity checks: Beyond the obvious cosmetic damage, we examined the chassis, frame alignment, and mounting points to ensure the vehicle’s structural safety hadn’t been compromised.
- Component functionality testing: We tested the boot mechanism, rear lighting systems, and electronic sensors to identify any hidden electrical or mechanical issues caused by the impact.
- Paint condition analysis: The distinctive orange finish required careful colour matching and assessment of paint damage extending beyond the immediate collision zone.
This vehicle presented typical rear-end collision damage: a crumpled boot lid, damaged tail lights, boot alignment issues, minor rear bumper deformation, and cosmetic damage to the aftermarket spoiler.
- Detailed Quote and Insurance Liaison
Following our inspection, we provided the owner with a comprehensive quote covering all necessary smash repairs. Our team also coordinated directly with the insurance company, streamlining the approval process. We handle the paperwork, negotiations, and follow-ups, allowing vehicle owners to focus on their daily lives whilst we manage the repair process.
Stage 2: Disassembly and Preparation
With approval secured, we moved into the crucial preparation phase. Professional smash repairs demand methodical disassembly to access damaged components and prepare surfaces for repair work.
- Systematic Component Removal
Our technicians carefully removed:
Rear spoiler: The aftermarket spoiler was unbolted and set aside for inspection, repair or replacement.
Boot lid: The damaged boot lid was removed from its hinges for panel beating and reshaping work.
Tail light assemblies: Both tail light units were carefully disconnected and removed to assess damage and prevent further harm during metalwork.
Rear bumper: We detached the bumper bar to access mounting brackets and the underlying structure.
Interior boot trim: Interior panels were removed to access the boot floor and rear panel from inside, ensuring complete access for panel beating.
Every removed component was labelled, catalogued, and stored safely.
- Surface Preparation and Detailing
Before any panel beating or paint refurbishing could begin, we thoroughly cleaned and prepared all affected surfaces. This involved removing dirt, grease, old wax, and any contaminants that could interfere with adhesion during painting. We also stripped away damaged paint layers from areas requiring bare-metal panel work, creating the perfect foundation for restoration.
Stage 3: Panel Beating and Structural Repairs
Panel beating requires years of experience and a delicate touch to restore damaged metal to its original contours.
- Expert Panel Beating Techniques
Our skilled panel beaters used several specialised techniques:
Traditional hammer and dolly work: Our technicians worked out dents and restored the boot lid’s smooth, flowing curves.
Metal shrinking: We used heat-shrinking techniques to restore the panel to its original dimensions without weakening the structure.
Stud welding and pulling: For deeper dents that couldn’t be accessed from behind, we used stud welding techniques combined with pulling equipment to draw the metal back into shape.
Frame straightening: We verified and corrected any minor frame misalignment using computerised measuring systems to ensure the vehicle would track straight and door gaps would remain perfect.
Throughout this process, our technicians constantly checked their work with straight edges, light reflections, and trained fingertips – catching even the slightest imperfections before moving forward.
- Body Filler Application and Shaping
Once the major metalwork was complete, we applied premium body filler to smooth out any remaining minor imperfections. Through the panel beating, the structural integrity had already been restored; body filler simply provided the final surface perfection needed for a flawless paint finish. Our technicians expertly mixed, applied, and shaped the filler, then progressively sanded from coarse to fine grades, creating an absolutely smooth surface ready for primer.
Stage 4: Paint Refurbishing and Colour Matching
The paint refurbishing stage is where the vehicle truly begins to look new again. For this Toyota 86’s distinctive orange finish, achieving an invisible repair required advanced colour-matching technology and exceptional skill.
- Advanced Colour-Matching Process
We used computerised colour-matching technology to analyse the exact colour, including UV fading and weathering on the original panels. This data guided our custom paint mixing, creating a perfect match for the existing orange finish.
- Multi-Stage Paint Application
Professional paint refurbishing follows a precise sequence:
Primer application: We applied high-build primer to the prepared surfaces, creating an ideal foundation for the colour coats whilst providing additional minor levelling.
Base coat application: Our painter applied multiple thin coats of the custom-matched orange, gradually building up the colour. Each coat was allowed proper flash-off time, ensuring even coverage and preventing runs or orange-peel texture.
Blend panel painting: To ensure an invisible repair, we blended the new paint into adjacent panels, gradually feathering the new colour into the existing finish. This prevents visible edges or colour mismatches.
Clear coat application: Multiple layers of clear coat provided depth, gloss, and UV protection. We applied enough clear to allow for colour sanding and polishing whilst maintaining long-term durability.
All painting occurred in our state-of-the-art spray booth, which maintains precise temperature and humidity control whilst filtering out any dust particles.
Stage 5: Detailing and Final Finishing
The detailing phase transforms good smash repairs into exceptional ones. This is where we refine the new paintwork to showroom standards and attend to every detail that makes the vehicle look and feel brand new.
- Colour Sanding and Polishing
Our detailers performed wet snading, machine polishing and hand finishing to ensure consistent perfection across the entire repair zone. This meticulous detailing work is what creates the stunning, glass-like finish that makes our smash repairs indistinguishable from factory paint.
- Component Reinstallation
With the paintwork perfected, we reinstalled all removed components, which included the boot lid, taillight, rear bumper, and spoiler. Every component was checked for proper function, and all trim pieces fit securely without rattles or gaps.
Stage 6: Quality Control and Final Inspection
Before returning any vehicle to its owner, we conduct rigorous quality control checks. This final inspection that includes paint quality inspection, panel gap verification, functional testing, structural integrity verification and many more analysis to ensure every aspect of our smash repairs meets our exacting standards.
If anything doesn’t meet our standards, it goes back to the appropriate department for correction. We don’t compromise on quality – ever. This commitment to excellence is why we’re trusted throughout Brisbane, from Woolloongabba to Salisbury.
- Pre-Delivery Detailing
Once quality control approval is received, we perform a final, comprehensive detailing: washing, clay-bar treatment to remove contaminants, machine polishing of the entire vehicle (not just repaired areas), interior vacuuming and cleaning, window cleaning inside and out, and tyre dressing. The result is a vehicle that looks better than before the accident – not just repaired, but genuinely refreshed.
Stage 7: Customer Handover and Warranty
The final stage of our smash repairs process is returning the vehicle to its delighted owner.
- Detailed Walk-Through
We don’t simply hand over keys. Our team walks the owner around the vehicle, explaining what was done and pointing out the quality of the repair work. We show before-and-after photos, demonstrate the function of repaired components, and answer any questions about the repair process or ongoing care.
For this Toyota 86 owner, the reaction was exactly what we work for: amazement at the transformation. The boot lid sat perfectly flush, the orange paint gleamed with showroom depth and clarity, panel gaps were factory-precise, and the spoiler aligned exactly as it should. More importantly, the owner had complete confidence that their vehicle was safe, structurally sound, and restored to its pre-accident condition.
Why Choose Salisbury Collision Centre for Smash Repairs?
This detailed case study demonstrates why vehicle owners throughout Brisbane trust us with their smash repairs:
Expert craftsmanship: Our technicians bring decades of combined experience to every repair, using time-honoured panel beating techniques alongside modern technology.
Advanced paint refurbishing: We invest in the latest colour-matching technology and maintain state-of-the-art spray booths, ensuring invisible repairs with factory-quality finishes.
Meticulous detailing: Our detailing processes go beyond basic cleaning, delivering the depth, clarity, and perfection that transform good repairs into exceptional ones.
Transparent communication: We keep customers informed throughout the repair process, manage insurance claims, and provide realistic timeframes.
Insurance approved: We work with all major insurance companies and handle claim paperwork, simplifying the process for customers.
Convenient location: Located in Salisbury, we’re easily accessible for customers throughout Annerley, East Brisbane, Greenslopes, Holland Park, Moorooka, Mount Gravatt, Sunnybank, Tarragindi, Woolloongabba, and Yeronga.
Don’t let collision damage stress you out. Contact us today for a free, no-obligation quote. Our experienced team will assess your vehicle’s damage, provide a detailed estimate, and explain exactly what’s required to restore your vehicle to pre-accident perfection.